Crafting Halloween Magic: DIY Clay Witch Hats
- Oct 5, 2025
- 4 min read
Updated: Nov 6, 2025
Yesterday I got into the spooky spirit with a fun hands-on craft day — making Halloween witch hats out of clay! The table was covered in sculpting tools, bits of clay, and plenty of concentration as we shaped our own mini magical masterpieces. From curling the hat brims just right to adding little stars and moons for decoration, it was the perfect mix of creativity and Halloween fun.
Why Witch Hats?
Our goal was to make beautiful witch hats that could sit over a tealight, casting a soft, flickering glow. I chose this project because Halloween is coming up — and my sister loves all things witchy! I even made some delicious snacks to enjoy while we sculpted and painted the day away.

Getting Started
I’d never made these before, so I roughly followed a YouTube tutorial. The video used kiln-fired clay, but we swapped it for air dry clay, which worked wonderfully. We originally wanted to use polymer clay, but the brand I bought crumbled and was unusable — a good reminder to always test your materials first! Thankfully, the air dry clay turned out to be a perfect substitute, and it is much cheaper than polymer clay.
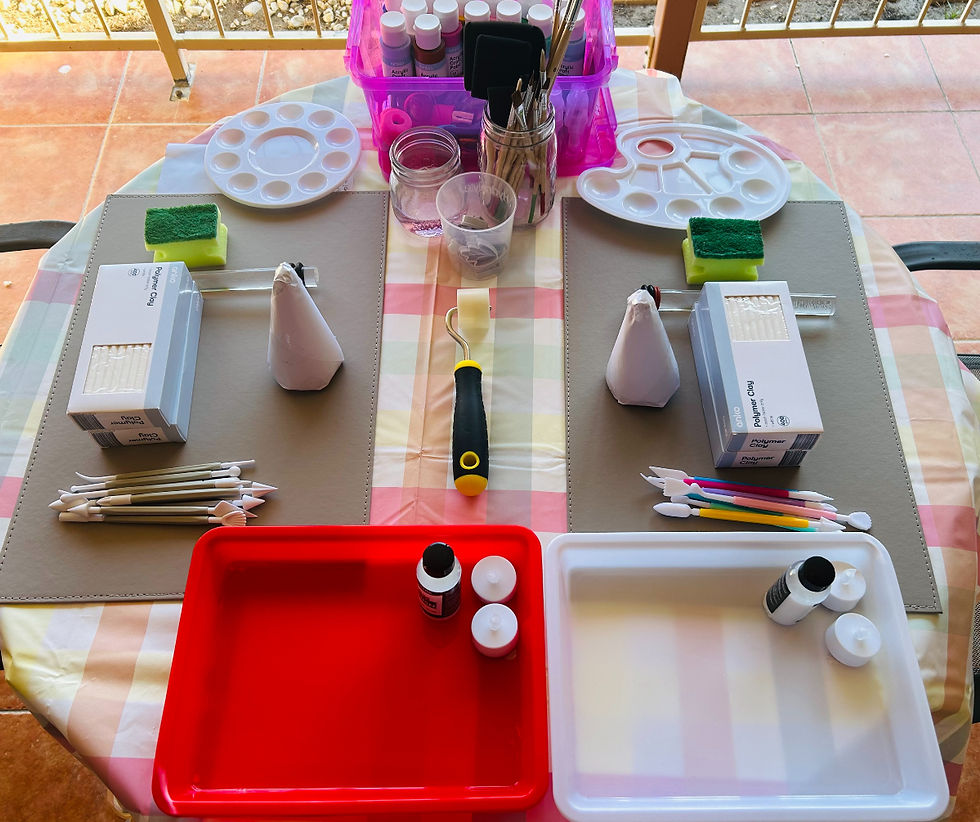
Budget-Friendly Crafting
Most of our supplies were budget finds from Kmart, Bunnings, Temu, and eBay, and you might already have some of these at home.
For this project we used:
1 kg white Air Dry Clay (Bunnings 1 packet per person is plenty)
Foam cones (ebay)
1 cheap pair of stockings
Clay tools (Temu)
Battery operated tealights so they're not flammable (Kmart)
Glitter (Temu)
Clay cutters (Kmart)
Paint set (Kmart)
Paint brushes (Kmart)
Palette set (Kmart)
Baking paper to help stop sticking
Clay Varnish (Temu)
Clay roller (Temu)
Placemat that's washable (Kmart)
Table cover for any mess (Kmart)
The best part? We had plenty of clay left over — so now we’re ready for another clay craft day soon!
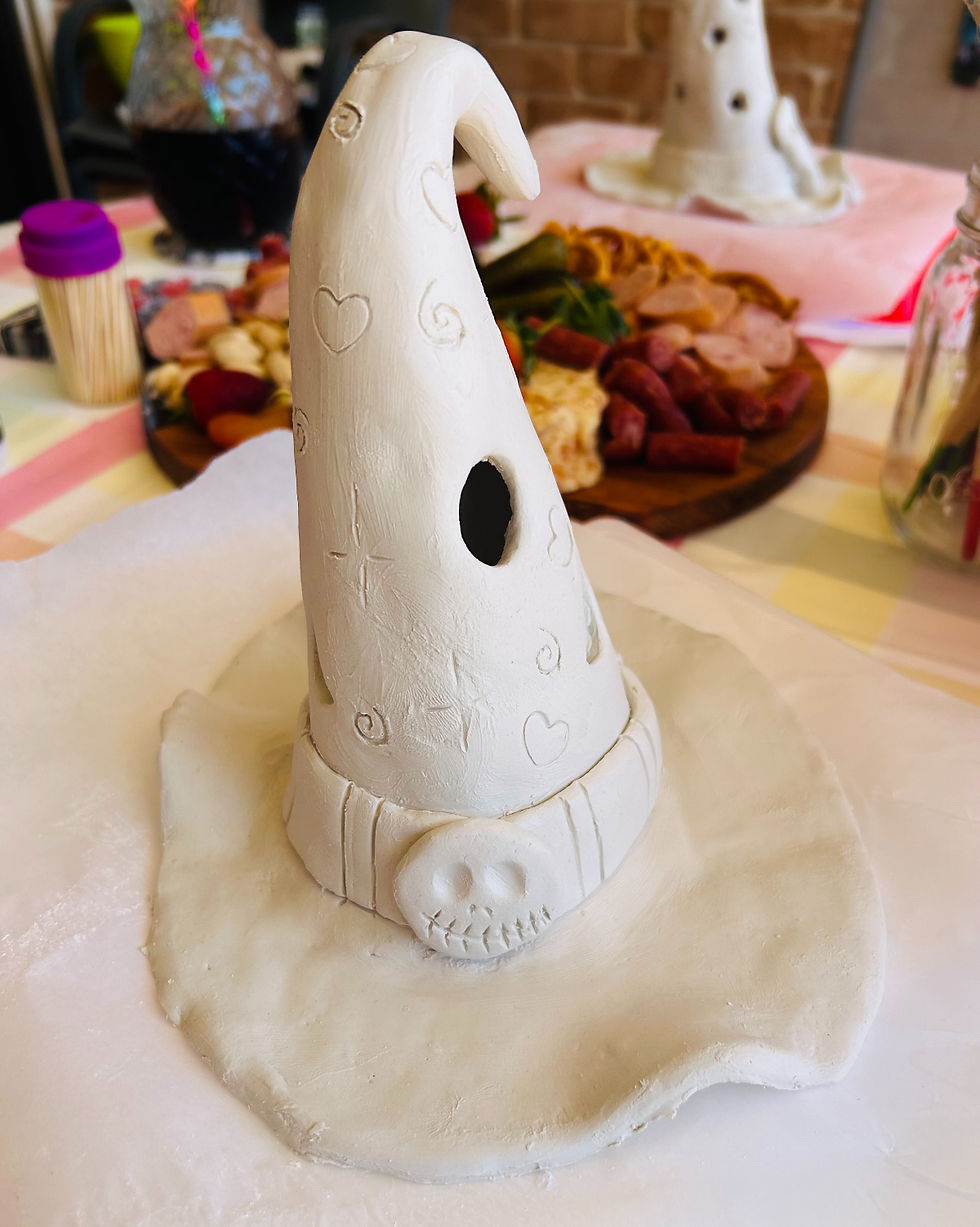
Shaping the Witch Hat
We started by making the top cone and curling the tip just right. Then we shaped the brim to sit neatly over the top. It was simple and satisfying, though attaching the two pieces was a bit nerve-wracking — I kept worrying my brim would fall off, haha!
Looking back, I’d make my brim a little thicker for stability. My sister’s hat held its shape better, so that’s a lesson learned for next time.

Adding Details and Decorations
Next came the fun part — decorating! We added clay bands around the hats, sealing them with cute little embellishments. You can add a moon, star, heart, flower, or even a classic buckle for a traditional look.
A handy tip: check which direction your hat tip is curling before attaching your band, so you know which side will be the “front.” My hat tip ended up curling forward — I would’ve preferred it to the side, but hey, learning is part of the fun!
We also cut out shapes to let the tealight glow shine through. My sister used a toothpick to even carve tiny swirls into hers — such a cool idea!
Painting and Finishing Touches
After letting our clay dry, we got to painting and adding glitter. I recommend at least 24 hours for drying, though we did ours soon after sculpting. We took inspiration from online photos but also followed our instincts with colours we loved.
The paint dried quickly thanks to the sunny, breezy day, and once we added varnish, the hats looked stunning — glossy, colourful, and full of character. We couldn’t stop admiring them!

Reflections and Mindful Making
What I love most about clay crafts is that every piece is one of a kind — no two creations are ever the same. The whole process was incredibly relaxing, especially the painting. When you’re crafting, you focus completely on the moment — the textures, colours, and details — and it becomes a form of creative mindfulness.
Our little craft day turned out to be the perfect way to celebrate and get into the Halloween spirit.

Try It Yourself!
If you’re looking for a fun, affordable, and relaxing Halloween craft idea, try making your own DIY clay witch hat tealights. It’s a great way to unleash creativity, spend quality time with your support person, friends or family, and make something truly magical for the spooky season.
Have you tried any fun Halloween crafts this year? I’d love to hear your ideas — share them in the comments below!
Accessibility Information
🎟️ Cost
$70.00 approx. for complete start up costs and for one person.
If you have most of the materials already, much less, as the clay is only $12.
If you have Flybuys points, redeem them to use at Kmart! (that helped me a lot)
🗓️ When
Whenever you like!
📍 Where
At home is easiest.
🍔 Food Options
Make your own yummy snacks, tailored to your budget.
I hope this information encourages you to experience this wonderful crafting day for yourself. If you think anything needs to be added regarding your disability, please feel free to CONTACT ME


Comments